How to Stop Gravel Driveway From Washing Out
Keep gravel in place on a slope, hillside, or inclined driveway by installing a geotextile grid before laying gravel. Other techniques for preventing gravel from sliding are excavating and building an 8–10 inch deep bed of gravel, adding drainage trenches or culverts to prevent washouts, forming a ridge along your gravel roadway to help it shed water, and building a border alongside your driveway or path to keep gravel contained.

Why is Your Gravel Sliding Downhill?
Most often, the cause of gravel slippage is improper installation. If the gravel was not laid to the proper depth, if drainage was not planned, or if an improper gravel type was used, it can account for material sliding downhill or becoming quickly destroyed by vehicle traffic.
- The gravel was not properly installed.
- The wrong type of gravel was used.
- Water runoff.
- The slope is excessively steep.
Gravel installed on a slope with a grade greater than 15% (a decline of 15 feet over a distance of 100 feet) will likely not stay in place regardless of the methods used in construction. If your driveway exceeds this slope, you may want to consider rerouting your driveway to make a gentler path.
What is the Best Type of Gravel for a Slope?

Always use angular gravel when laying a driveway or path, especially on a slope. These sharper stones lock together and resist sliding, while smooth gravel—such as pea gravel and river rock—slide easily.
- Use angular rocks with squared-off edges.
- Avoid smooth rock or round gravel—it is prone to sliding.
- Lay gravel in three layers, going from large gravel, to medium-sized gravel, to small gravel on top.
It's essential to use different types of gravel to build up a proper base for a roadway or path. By laying large gravel first, then gradually transitioning to smaller sizes, you have a firmer roadway with better drainage.
Top 5 Methods for Keeping Gravel in Place on a Hill
There are several ways to improve the stability of gravel laid on a slope or hillside. Several of these methods can even be used together, to create a durable surface that resists erosion, ruts, flooding, and slippage. This will save you a lot of work regrading or raking gravel surfaces.
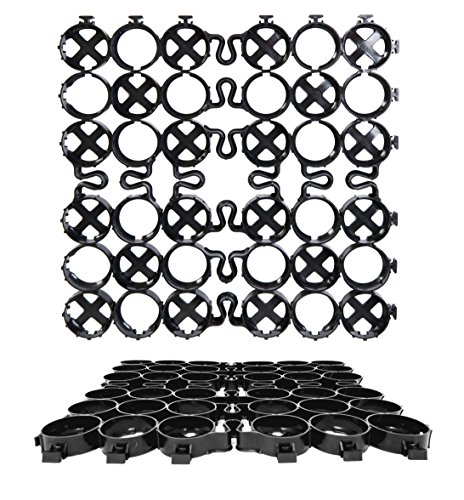
Use a Gravel Grid
Installing a plastic or geotextile grid before pouring gravel is an excellent way to keep gravel in place on steeper slopes. The honeycomb structure of the grid forms several "cups" that capture the gravel and hold it in place. For additional stability, secure the grid to the soil using rebar stakes or a similar implement before adding gravel.
- Use a plastic grid to keep gravel in place.
- When using a gravel grid, it's important to secure the grid to the soil before pouring gravel, otherwise, both grid and gravel may slip.
- After installing your grid, fill it with crushed stone #3, which is 1/2–2 inch gravel mix.
After the gravel grid is filled with #3 crushed stone, top it off with smaller gravel, such as #57 and #411 for a finer, more compact gravel path. This installation will stay in place even on steep slopes.
All-Weather Easy-to-Use Pavers
We earn a commission if you click this link and make a purchase at no additional cost to you.
Build a Gravel Base Layer
When laying gravel on an incline, it's important to build it to a depth of 8–10 inches for driveways and roadways. This can be accomplished by excavating and grading the planned roadway with heavy machinery, or by laying gravel on top of existing material, with plans for installing a border once the gravel has been installed. To build a gravel surface that will stand up to vehicle traffic on a slope without slipping, do the following:
- Excavate 8–12 inches and grade the roadway. Alternatively, grade the area and plan to contain gravel once it is installed.
- Plan and install any culverts you wish to run under the gravel at this time.
- Spread 4 inches of stone or #3 crushed rock. Roll to compact.
- Spread 4 inches of crushed stone #57. Roll to compact.
- Spread 4 inches of crushed stone #411. Roll to compact.
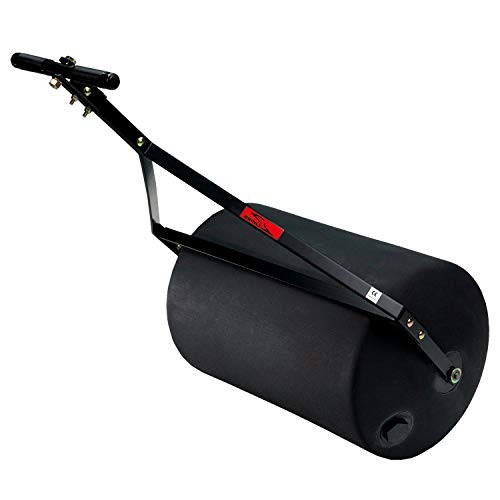
It's key to lay your gravel in layers, using a lawn roller to compact each layer. Moving from large gravel to smaller gravel is key to building a durable gravel base. This allows for proper drainage and compaction, which adds to the durability and resists flooding.
Durable Construction Roller
We earn a commission if you click this link and make a purchase at no additional cost to you.
Create Proper Drainage
Washouts and flooding are major causes of gravel sliding downhill or forming deep ruts, so it's important to create proper drainage. A dry gravel path or driveway is far more likely to remain in place. If you are planning a new gravel path, you can install concrete culverts beneath the gravel, to direct water under your gravel instead of over the top. For existing gravel paths and driveways, dig a trench drain alongside to keep them dry.
- Determine where water flows from the hill onto your gravel.
- Dig a drainage trench to intercept the water before it reaches the gravel. Channel it downhill.
- If you are installing a new gravel driveway or path, plan to install culvert pipes beneath the gravel in areas that are prone to flooding.
- If you have culverts beneath your gravel, direct your drainage trenches to funnel the water through the culverts.
The good news is, since your gravel is installed on a hill, you have the perfect circumstances to dig drainage trenches that channel the water safely downhill before it ever pools on your gravel. This can make preventing washouts and flooding easier than it would be in flat areas.
Create a Crown to Your Gravel Driveway or Path
When installing gravel, do not lay it in a flat, level layer from one side to the other. This causes water to pool and increases the chance of gravel sliding downhill. Instead, build your driveway or path so that there is a higher ridge in the center that slopes gently to the sides. This ridge or "crown" will shed rainwater and keep your gravel dry and in place.
- When layering and compacting gravel, build a crown along the center of the path or roadway.
- Slope the gravel gently downward on either side of the crown.
- The crown should be 3–6 inches higher than the edges.
- This crown will help your gravel shed water and resist water-induced erosion.
Any way you can help your gravel shed water is a huge bonus. Few things are more likely to cause your gravel to slide downhill than vehicle traffic on a flooded or soggy section of gravel.
Control Gravel With a Border

A border of stones, pavers, or bricks can help contain gravel and keep it from sliding. Additionally, if you have built up a deep gravel base, this small wall will keep the gravel from spreading outward. Don't worry about the border serving as a trap for water. If you have built gravel from a base of varying sizes and installed drainage alongside your gravel, flooding won't be an issue.
- Line your gravel path or driveway with concrete, stones, or even wood to keep it contained.
- A border will prevent gravel from spreading and keep it compacted and stable enough to resist slipping downhill.
- A border will not increase flooding risk to properly installed gravel with adequate drainage.
In addition to physically keeping your gravel in place, borders can also be attractive features for your home. A properly marked and bordered driveway has a much neater look than a ragged gravel drive that peters off on either side.
How Do You Keep Gravel from Sliding Down a Hill?
Steep slopes can cause gravel to slide downhill, eroding your path or driveway. To prevent gravel from sliding:
- Install a gravel grid before pouring gravel.
- Pour an 8–12 inch gravel base of different rock sizes, compacting each layer for durability.
- Install drainage trenches alongside your gravel, to channel water downhill and prevent washouts.
- Lay your gravel so that the center of the path or driveway is crowned and slopes off to the sides, to shed rainwater.
- Install a border alongside your gravel to maintain proper compaction and physically contain gravel.
Each of these methods will go a long way to maintaining a durable gravel path on a slope. By combining several of them, such as a gravel grid, drainage trenches, and a border, you can construct a gravel surface that holds up to the elements with little upkeep.
How to Stop Gravel Driveway From Washing Out
Source: https://peppershomeandgarden.com/keeping-gravel-in-place-slope/


0 Response to "How to Stop Gravel Driveway From Washing Out"
Post a Comment